Import a picture allows you to import non-RealCADD images into your drawing. This can be particularly useful in Workbook mode, where images may need to be interspersed with RealCADD drawings and text.
Most common formats are supported including:
Photoshop (.psd)
SGI (.sgi)
PICT (.pct)
JPEG (.jpg)
GIF (.gif)
PNG (.png)
TIFF (.tif)
QuickTime (.qtif)
Truevision TGA (.tga)
Windows Bitmap (.bmp)
When you click Import a picture, a new Finder window will open, allowing you to navigate through your computer's folder hierarchy to locate the image you wish to import. The image can be anywhere on your computer or any other computer on your network. Once you locate the image, select it (either by double-clicking or single click and Open). This will bring up the dialogue shown on the right.
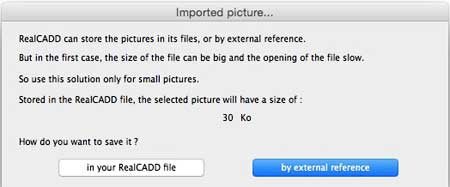 You have two options to save the image so that RealCADD can display it:
In RealCADD. This will add the image directly to your drawing and it will be saved as an integral part of the drawing along with everything else. The file size of the image will be added to the file size of your RealCADD drawing. The dialogue window tells you how big your image is (in this example is is showing 30KB). If the image is large, this may make the file slow to open and slow to refresh as you scroll the drawing. Usually this option is best reserved for small images, like logos for example.
By external reference. In this case the image will stay put in its original location and RealCADD will save the necessary information to locate it when the drawing is re-opened. Generally use this method if your image is large. Once you have saved the RealCADD file, don't move the image to a different location, as the external reference will then be incorrect and RealCADD won't be able to find it – it will load up a generic Realbasic image instead.
A PICT image will load directly into your RealCADD file without bringing up this dialogue and will automatically be saved as part of the RealCADD file.
You can manipulate imported images just like any other component in the drawing, but because the image is a single composite object, the possibilities are naturally more limited. Duplicate, Duplicate and move, Align, Distribute, Lock, Unlock, Send backward, and Put in front of, can all be used. And when dragging the image, the commands selected in the Snap pallet will apply. Mirror and Rotate cannot be applied; Symmetry with axis can be applied but the image isn't reversed, and if the line of symmetry is something other then vertical or horizontal, the image will be distorted.
Tip:The ability to import an image (often jpg or pdf) is very useful to recreate in RealCADD technical drawings of components. Once you have imported the image, you can re-size it until the given measurements are reasonably accurate at the scale you intend to draw at. Then arrange the drawing in layers, with the image visible below the drawn layer, but with Attraction and Selection of visible layers turned off (un-check the check boxes) – See Window >> Layers/Pages…. You can then draw over the image on your drawn layer, without constantly selecting the image by mistake.
If you save RealCADD files with images in them to DXF or DWG formats, the images will not be saved.