Initially RealCADD will open with a new Plan – "Untitled 1" – which will be displayed at the bottom of the Window menu. As more drawings are opened, they will add to the list. To move from one to another, simply click the one you want. The current drawing will be ticked.
Using the Library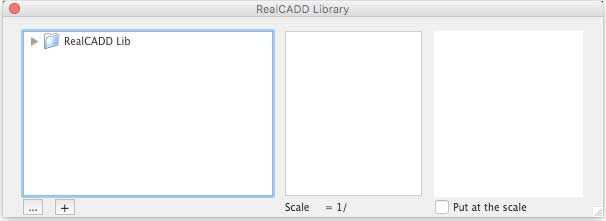 The Library is where you store regularly used drawn objects, so they can be used over and over again without having to draw them anew each time.
Library files are just regular RealCADD drawn objects, stored in such a way that you can access them easily.
By default the Library is located in a folder called RealCADD Lib. With the Cocoa build, is located in Documents/RealCADD. With the Carbon build it is located in Applications/RealCADD.
Clicking Windows >> Library opens the standard Library pallet shown right. To use a Library object in your drawing, click the little triangle ![]() to display the library items.
to display the library items.
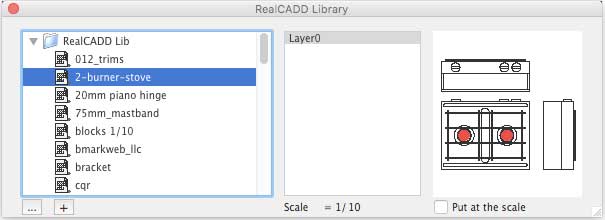 Here is my library expanded. The "2-burner stove" is selected. You will see that it shows the scale (1:10 in this case) that the original library object was drawn at.
If the drawing you want to use it on is the same scale, simply drag the image of the stove in the right-hand window on to your drawing.
If your drawing is at a different scale, check the "Put at scale" box before you drag it and RealCADD will rescale it to the scale of your drawing.
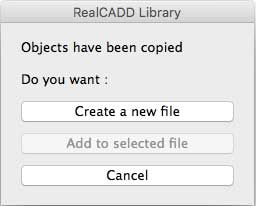 Draw the object that you want to add – or open an existing drawing with the object on it. Select the object and copy it (⌘C). Click the
 ![]() sign. You will get the little window to the right. If you hit the
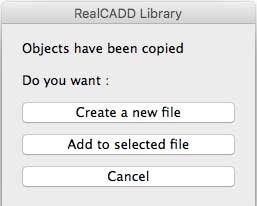
sign. You will get the little window to the right. If you hit the ![]() sign without first copying the object, you will get a message telling you that no objects have been copied.
sign without first copying the object, you will get a message telling you that no objects have been copied.
 At this time the only option is to create a new file. If you want to add your object to an existing file, you need to select that file under the expanded library before you hit the
 ![]() sign. We will deal with that option shortly.
sign. We will deal with that option shortly.
Hit the "Create a new file" button. Don't worry – you aren't going to make a new library as the title suggests – you are simply going to add a drawing file to your existing library. Give the file a name and hit OK.
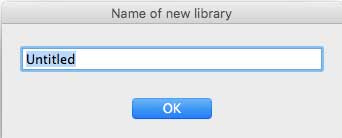
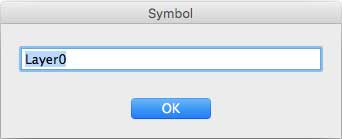 This will bring up the next pane, which is basically asking you to give the Layer a name – the default is Layer0. Name it something appropriate – or leave it as Layer0 and hit OK.
You're done! Your object is now in the library and can be used whenever you want.
First expand the library and select the existing file that you want to add the object to.
 As before, draw the object that you want to add – or open an existing drawing with the object on it. Select the object and copy it (⌘C). Click the
 ![]() sign. You will get the little window to the right. If you hit the
sign. You will get the little window to the right. If you hit the ![]() sign without first copying the object, you will get a message telling you that no objects have been copied.
sign without first copying the object, you will get a message telling you that no objects have been copied.
 Hit the "Add to selected file" button.
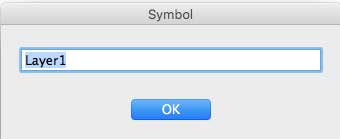
Because you are adding the new object to an existing file, it will go on a new layer. We are adding it to the file created above which already has Layer0 (or whatever you named it). So the next layer will default to Layer1. If there were already, say, four layers in the file, it would default to Layer5 and so on. Name the layer (or leave it as Layer1).
You're done! Your object is now in the library in the selected file (as Layer1, or whatever name you gave it) and can be used whenever you want.
To use objects on specific layers in a library file, simply click the layer name and then drag the object to your drawing (checking "Put at scale" if necessary).
As mentioned above, the default location for your library is in the RealCADD folder, either in Documents (Cocoa) or Applications (Carbon). You can however, decide to have the library wherever you want it. So, create and name the folder.
Hit the  button, which will then allow you to navigate to the folder you would like your library to be in. Select the folder and hit the Choose button, bottom right on your screen. This will now be your library folder.
Tip If you update your RealCADD to a new version, you will need to choose your library location again. If it is a specific folder of your own, then simply hit the button and choose it for the new version.
In Finder, navigate to the library (either in the default location or a chosen location) and drag the file that you want to delete to the Trash.