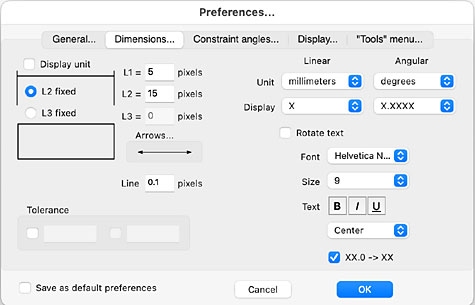
 The Dimensions pane allows you to control the behaviour of the six dimensioning tools in the "Tools" pallet (see the Window >> Tools menu item). The six tools are Single dimension tool, Multiple dimension tool and Measuring tool; Radius dimension tool, Diameter dimension tool and Angular dimension tool.
Display unit does exactly what it says: when the box is checked the unit of measurement will be displayed after the measurement as shown below.
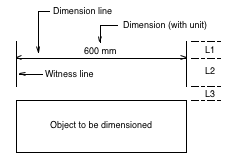 L1, L2 & L3. These can cause a little confusion, but in reality are very simple.
L1 is the distance the witness lines extend beyond the dimension line.
L2 is the distance the witness lines extend from the dimension line towards the object.
L3 is the distance the from the object to the start of the witness lines.
However you can only specify either L2 or L3. If you specify L2, then L3 will get greater the further you drag the dimension line from the object, and L2 will stay fixed at the length you specify. Conversely, if you specify L3, then L2 will get longer the further you drag the dimension line from the object, and L3 will stay fixed at the length you specify.
Probably the most common setting would be to specify L3 fixed and let L2 vary.
Arrows... controls what type of arrow the dimension line displays. To select this, mouse over the line with the arrows on and hold the mouse button down. The available arrow styles will appear. Still holding the mouse button down, move along the available arrow styles until you get to the one you want to use, and let go the mouse button go. The display will change to the arrow style you selected.
Line. Specify the thickness in pixels of the dimension and witness lines. You can enter any thickness – they don't necessarily have to be those that are preset in the Attributes pallet and it won't affect other line thicknesses elsewhere in the drawing.
Tolerance allows you to automatically add tolerance upper and lower limits to the dimensions. This is mostly used in engineering drawings.
Linear – Units selects the units from the drop-down menu to be used for linear dimensions.
Metric: Choose from kilometres, metres, centimetres and millimetres.
Pixels: Mostly used for drawings for screen use.
Customary US units: Choose from decimal feet, decimal inches, fractional feet and inches and fractional inches.
Linear – Display This sets the precision to which the linear dimensions are displayed. It doesn't affect the accuracy of the drawing, nor does it affect the display in the Edit pallet. The options will vary according to which units you have selected. Select from the drop-down menu.
Metric: From a whole number (X) up to six decimal places (X.XXXXXX). The last number will be rounded as usual: ≥.5 rounds up; <.5 rounds down.
Pixels: From a whole number (X) up to six decimal places (X.XXXXXX). The last number will be rounded.
Customary US units: With decimal feet and decimal inches, choose from a whole number (X) up to six decimal places (X.XXXXXX). The last number will be rounded. With fractional feet and inches or fractional inches, the selection runs from ½" to 1/512".
Angular – Units selects the units from the drop-down menu to be used for angular dimensions. Choose from radians, degrees or grades.
Angular – Display selects the precision to which the angular dimensions are displayed. It doesn't affect the accuracy of the drawing, nor does it affect the display in the Edit pallet. The options will vary according to which units you have selected. Select from the drop-down menu.
Radians & grades: From a whole number (X) up to six decimal places (X.XXXXXX). The last number will be rounded as usual: ≥.5 rounds up; <.5 rounds down.
Degrees: From a whole number (X) up to six decimal places (X.XXXXXX). The last number will be rounded. Additionally you can select to display degrees in degrees & minutes (0º 0') or degrees, minutes & seconds (0º 0' 0").
Tip: Regardless of whether the "Display unit" box is checked or not, angular measurements expressed in degrees will always display the unit if either "degrees & minutes" or "degrees, minutes & seconds" is selected.
Rotate text. Check this box to have the measurement text display at the same angle as the dimension line. If left unchecked, dimension text will always be horizontal regardless of the angle of the dimension line.
Font. Select the font to be used for dimensions from the drop-down menu. This doesn't affect the font used elsewhere on the drawing (this is selected in the Text pallet).
Size. Select the size of the font to be used for dimensions from the drop-down menu. You can select from eight preset font sizes, or Other... to specify a font size that is not included in the preset sizes. This doesn't affect the font size used elsewhere in the drawing (this is selected in the Text pallet).
Text. The default for the dimension text is plain text. If you want your dimensions to be Bold, Italic or Underlined, select it here. You can select any one, or any mix of the three. The icons toggle, so to deselect, just click the appropriate icon a second time.
Position. This little drop-down menu controls the position of the dimension text relative to the dimension line. There is a choice of:
Center: Dimension text is centered in the dimension line.
Bottom: Dimension text is below the dimension line.
XX.0 -> XX. Checking this box will cause a dimension that is a whole number to display as such, even though a display precision to one or more places of decimals has been selected. For example: You have selected to display dimensions to 3 places of decimals, but the object you are dimensioning is an exact whole number, your dimension will display as XX, rather than XX.000.
Save as default preferences. This does exactly what you'd expect: it saves your Preferences as the default. These will apply to any new drawing opened, but will not change the Preferences of previously saved drawings. Leave this unchecked if you are just setting Preferences for a single drawing and don't want them to apply to future drawings.
Tip: A Dimensions pane is also available directly from the Tools pallet. Option/Alt-click or double-click any of the six dimensioning tools.